前言 2016 年 11 月,ThoughtWorks 在技术雷达(Technology Radar) 中首次提出了微前端(Micro Frontends) 的概念,将后端微服务化的思想引入前端。此后,在前端社区中,出现了很多优秀的开源解决方案,例如 SingleSPA 、Qiankun 、IceStark 等。Phodal 的文章 。关于这些实现方式和微前端诞生的意义、解决的业务痛点,在这里就不再赘述了。
设计思路和实现 从目前开源社区的现状来看,SingleSPA 是一个发展历史比较悠久的微前端解决方案,拥有完善的社区支持和维护力量。
需求拆解 我所提供的思路在大体上和 SingleSPA 相同,但在一些细节上会做一些个人认为更优的处理。先对需求做一些拆分:
主应用和子应用都不应该被限制所使用的技术栈
主应用和子应用都不应该被限制所采用的部署形式和位置
主应用应该实现启动时注册约定好数据结构的子应用配置信息的方法
主应用应该只作为加载各个子应用的容器,而不建议写入过多的业务代码和样式代码
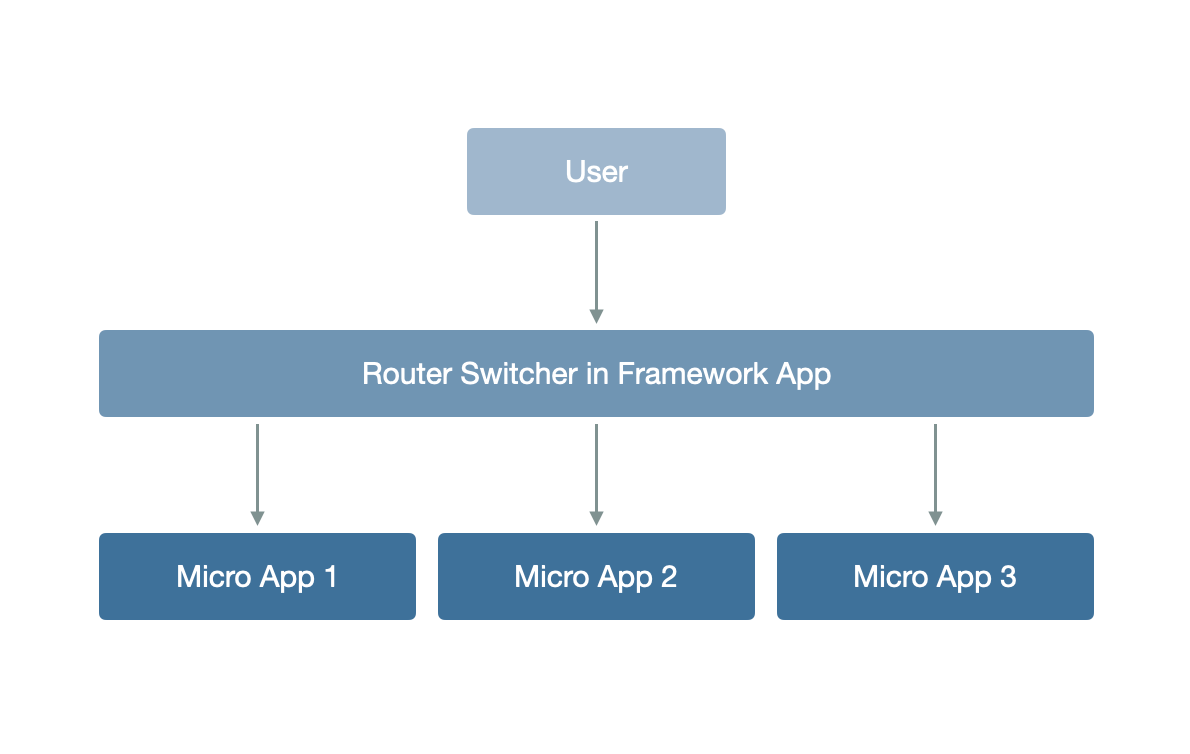
主应用应该掌控全局路由,并通过监听全局路由事件管理子应用的生命周期
主应用将子应用挂载完成后,应该把路由交给子应用接管,但仍保留一级路由的监听器
主应用应该实现子应用所有的生命周期,并拥有处理这些生命周期对应的勾子函数的权利
主应用应该有效地隔离全局变量和样式以避免子应用间可能存在的交叉污染
主应用应该支持引入全局的依赖以避免子应用重复引用相同的依赖造成不必要的体积浪费
主应用应该实现全局变量共享和应用间通信机制
子应用应该提供挂载点、JS 资源、CSS 资源及其他可能被要求提供的信息
子应用可以是一个独立的 SPA APP ,并能通过挂载到某个 DOM 节点上完成渲染
子应用应该可以独立开发、独立部署,甚至独立运行
子应用应该无法感知自己身处何种环境,例如在某个主应用、在另一个不同的主应用或是独立运行
此时,主应用和各个子应用之间的联系可以抽象成下图所示的内容:
它不仅能给予主应用和子应用足够的灵活度(因为技术栈不受限制,并且子应用构建后的产物格式没有特别大的变化 ),也使得对子应用的侵入性几乎降低到 0(当然,打包子应用时可能需要修改产物的 publicPath )。将它命名为 Faun(国际标准音标:/ˈfɔːn/,取自古罗马神话中半人半羊的精灵)。其构造函数如下:
1
2
3
4
5
6
function Faun ( const props = { registeredSubApplications : {}, } }
关于 Faun 的相关文档和仓库地址,请见相关链接 。
子应用配置约定 目前采用的子应用配置约定是最简化的,即主应用从远程拉取(也可以硬编码)一份包含各个子应用信息的字典格式的数据,其定义如下:
1 2 3 4 5 6 7 8 9 10 11 12 13 14 declare interface ISubApplicationConfig { scripts?: Array <string >; styles?: Array <string >; mountPointID : string ; useCSSPrefix?: boolean ; assetURLMapper?: (url: string ) => string ; prefixElementSelector?: () => Node ; } declare interface ISubApplicationConfigMap { [key : string ]: Partial <ISubApplicationConfig >; }
之所以采用字典数据结构组织子应用配置表,是因为在一个运行时环境里,一个激活路由只能对应一个子应用。 因此采用此数据结构不需要投入额外的成本确保激活路由与子应用对应关系的唯一性。
一份最简单的配置表可以是这样:
1
2
3
4
5
6
7
8
9
10
11
12
13
14
15
16
17
18
19
20
21
22
const configMap = { '/vue' : { scripts : [ '//localhost:8181/app.js' , ], styles : [], mountPointID : 'app' , useCSSPrefix : false , assetURLMapper : url =>'//localhost:8182' + url, prefixElementSelector : => document .body , }, '/react' : { scripts : [ '//localhost:8182/static/js/main.bundle.js' , '//localhost:8182/static/js/vendors.chunk.js' , ], styles : [ '//localhost:8182/static/css/main.css' , ], mountPointID : 'root' , }, }
注册子应用 注册子应用功能将拉取的配置表复制一份至 Faun 实例中的 props 里:
1
2
3
4
5
6
7
8
9
this .registerSubApplications = function (subApplicationInfo ) { if (typeof subApplicationInfo !== 'object' || Array .isArray (subApplicationInfo)) { return this ; } Object .assign (this .registeredSubApplications , { ...cloneDeep (subApplicationInfo), }); }
路由监听 由于二级及以下的路由将会被子应用接管,而子应用可能会采用 Hash 模式管理应用的路由,因此为了兼容 Hash 模式的子应用,主应用采用 History 模式管理路由。 History.prototype.pushState 方法改变 History 路由,但是 onpopstate 方法只能监听 popState 操作(即 History 模式下浏览器的回退/前进操作),如果希望能监听 pushState 操作,需要重写 pushState 方法,调用 dispatchEvent 方法。history 实现 History 路由变化的监听。
1
2
3
4
5
this .history .listen (function (location, action ) { handleRouteChange (...); }
其中 handleRouteChange 函数如下:
1
2
3
4
5
6
7
8
9
10
11
12
13
14
15
16
17
18
19
20
21
22
23
24
25
26
27
28
29
30
31
const handleRouteChange = function (props, location, callback ) { const nextPathArray = location.pathname .split ('/' ); const previousPath = props.currentLocation .pathname || '' ; const previousPathArray = previousPath.split ('/' ); previousPathArray.shift (); nextPathArray.shift (); if (previousPathArray[0 ] === nextPathArray[0 ]) { return ; } const nextPathname = `/${nextPathArray[0 ]} ` ; const previousPathname = `/${previousPathArray[0 ]} ` ; callback && isFunction (callback) && callback (previousPathname, nextPathname); }; handleRouteChange (props, location, function (prev, next ) { refreshLocation.call (props, _this.history .location ); if (!unloadSubApplication (props, prev, next, _this)) { return ; } loadSubApplication (props, next, _this, action, _this.history .location ); });
对于全局拦截 a 标签点击事件进行 History 跳转,其实这个功能当时卡了我挺久,算是第一个坑。最后采取了如下方式拦截 a 标签的点击事件,虽然并不是特别完美。为了实现对特定 a 标签的拦截,需要实现一个 Event Listener,监听全局 click 事件,并拦截标签名、是否有 data-faun-link,以及 href 是否同域:
1
2
3
4
5
6
7
8
9
10
11
12
13
14
15
16
17
18
19
if ( event.target .tagName .toLowerCase () === 'a' && event.target .hasAttribute ('data-faun-link' ) && event.target .host === window .location .host ) { const { pathname, search } = event.target ; const currentRoutePathname = pathname || '' ; const currentRouteSearch = search || '' ; const currentRouteResources = props.registeredSubApplications [currentRoutePathname]; if (currentRouteResources) { history.push (`${currentRoutePathname} ${currentRouteSearch} ` , generateRandomString ()); } else { throw new ReferenceError (...); } return false ; }
为了使主应用可以使用 history 切换路由,将 history 作为一个 API 暴露于原型和构造函数中:
1
2
import { createBrowserHistory } from 'history' ;Polyatomic .prototype history = Polyatomic .history = createBrowserHistory ();
在主应用中,可以调用 history 实现路由的跳转,引起 History 监听到变化的事件:
1
2
const app = new Polyatomic ();const Foo = (<a onClick ={() => app.history.push('/route1')}>Route 1</a >
主应用技术栈为 Vue:
1
2
3
4
5
6
7
8
9
10
11
12
13
14
<template> <a @click="handleClick">Route 1</a> </template> <script> export default { methmods: { handleClick() { const app = new Polyatomic(); app.history.push('/route1'); }, }, } </script>
主应用技术栈为原生或 jQuery:
1 2 3 4 5 6 7 <a onclick ="handleClick" > Route 1</a > <script > function handleClick ( var app = new Polyatomic (); app.history .push ('/route1' ); } </script >
在任何技术栈的主应用 中,在 a 标签中使用 data-faun-link ,并将 href 设置为 / 开头的字符串或者与主应用同域的链接,将会被 onclick 拦截并执行 history.push,从而实现类似于超链接跳转的效果:
1 <a href ="/route1" data-faun-link > Route 1</a >
由于采用 history 作为处理路由变化的通用工具,以及在设计上抹平了采用不同技术栈的主应用在 history 调用上的差异,因此,主应用的技术栈可以不受限制 。
沙箱 为了避免子应用间 JS 和 CSS 的污染和冲突,以及更方便地管理子应用的行为,需要引入「沙箱(Sandbox)」的概念,将上述能力封装在沙箱内。沙箱的构造函数如下:
1
2
3
4
5
6
7
8
9
10
11
12
13
14
15
16
17
18
19
20
21
22
23
function Sandbox (name, useCSSPrefix = true ) { const props = { domSnapshot : [], mountPointElement : null , windowSnapshot : {}, prefix : random (), bundleExecutors : [], styleElements : [], disableRewriteEventListeners : null , modifiedPropsMap : {}, observer : null , childNodeOperator : childNodeOperator (), defaultPrefixElement : document .documentElement , }; this .mountPointID = '' ; this .name = name || '' ; this .bundles = []; this .css = []; this .useCSSPrefix = useCSSPrefix; this .assetURLMapper = url => this .prefixElementSelector = () => props.defaultPrefixElement ; }
创建沙箱 沙箱的创建通过 Sandbox 中的 create 方法实现:
1
2
3
4
5
6
7
8
9
10
11
Sandbox .prototype create = async function (subApplicationConfig ) { const { mountPointID } = subApplicationConfig; if (!subApplicationConfig || !mountPointID || typeof mountPointID !== 'string' ) { return ; } this .mountPointID = mountPointID; this .mountPoint = createElement ('div' , { id : this .mountPointID }); };
create 是一个异步函数,接收子应用配置表。
获取 JS 资源 一个子应用的 JS 资源就是一个被打包工具(如 Webpack、Parcel、Rollup 等)构建后的产物,即 Bundle。在一般场景中,这些 Bundle 会以动态 script 标签的形式注入 URL,随后浏览器加载这些 Bundle,Bundle 执行后就可以认为完成了渲染。因此,它们本质上可以通过 eval 执行的。我将这些 Bundle 代码封装进一个函数,作为 Bundle 执行函数:
1
2
3
4
5
6
7
8
9
10
11
if (subApplicationConfig.scripts && subApplicationConfig.scripts .length ) { for (const bundleURL of subApplicationConfig.scripts ) { this .bundles .push (bundleURL); const data = await fetch (bundleURL); if (data) { this .bundleExecutors .push (new Function (data)); } } }
获取 CSS 资源 与获取 JS 资源类似,CSS 资源也是通过 Ajax 获取内容后生成一个 style 标签的:
1
2
3
4
5
6
7
8
9
10
11
12
if (subApplicationConfig.styles && subApplicationConfig.styles .length ) { for (const stylesURL of subApplicationConfig.styles ) { this .css .push (stylesURL); const data = await fetch (stylesURL); if (data) { const prefixedData = cssPrefix (data, this .prefix ); const currentStyleElement = createElement ('style' , { type : 'text/css' }); currentStyleElement.innerHTML = prefixedData; this .styleElements .push (currentStyleElement); } } }
样式隔离 CSS 不具有作用域(Scope)或命名空间(Namespace),因此某个子应用有可能受主应用样式和其他子应用样式的影响。为了避免这种情况,需要在沙箱中实现样式隔离。对于样式隔离,社区中已有一些很不错的方案,例如:利用 HTML Entry 的特性、Shadow DOM、CSS Module、动态 style 标签等。我在沙箱中采用三种方式用于隔离样式:契约、动态 style 标签以及 PostCSS 和 postcss-prefix-selector 插件共同实现样式的隔离。
契约 对于每一个注册到主应用的子应用,其外层包裹一个在所有子应用范围内唯一的类名,例如:
1
2
3
.xeUj3 .button { background-color : #ddd ; }
对于应用 2:
1
2
3
4
.jtW3yK .button { background-color : #eee ; outline : none; }
对于每个挂载点,都必须加上约定的类名,例如应用 1 的挂载点可以是 <div id="app" classname="xeUj3"></div>。具体可以参考微前端在美团外卖的实践 。采用这种方式组织起来的应用通常是最容易被打破规则的,因为契约的遵守完全取决于每个子应用的开发维护团队,而人往往是一个流程或一个体系里最薄弱和不确定性最强的环节。因此,在一个主子应用体系中,不能只采用契约作为唯一的样式隔离方式。
动态 style 标签 动态 style 标签的实现较为简单,可以依托沙箱的挂载和卸载能力实现。head 标签内:
1 this .styleElements .forEach (element =>document .head .appendChild (element));
同理,在沙箱卸载时,从 head 中移除被 append 的标签。
CSS Prefix 机制 使用 css 解析获取到的 CSS 规则字符串,循环遍历每个选择器,并按一定的规则为其添加一个前缀,该前缀为 Sandbox.prototype.prefix:
1
2
3
4
5
6
7
8
9
10
11
12
13
14
15
16
17
18
19
20
21
22
23
24
25
26
27
28
29
30
31
32
33
34
35
36
37
38
39
40
41
42
43
44
45
46
47
48
49
50
export default function (input, prefix ) { if (!input) { return '' ; } if (!prefix) { return input; } const parsedStyleRules = parse (input); const prefixWithSpace = /\s+$/ .test (prefix) ? prefix : `${prefix} ` ; const keyframeRules = [ 'keyframes' , '-webkit-keyframes' , '-moz-keyframes' , '-o-keyframes' , ]; function excludeSelector (selector, excludeArr ) { return excludeArr.some (excludeRule => if (excludeRule instanceof RegExp ) { return excludeRule.test (selector); } return selector === excludeRule; }); } parsedStyleRules.stylesheet .rules .forEach (rule => if (rule.type !== 'rule' ) { return rule; } if (rule.parent && keyframeRules.includes (rule.parent .type )) { return rule; } rule.selectors = rule.selectors .map (selector => if (excludeSelector (selector, ['html' , 'body' , '*' ]) || selector.startsWith (`.${prefix} ` )) { return selector; } return '.' + prefixWithSpace + selector; }); }); const result = stringify (parsedStyleRules); return result; };
默认规则会将 html 、body 、* 选择器排除在外。prefix 的生成,使用 generateRandomString 函数生成一个 8 位随机字符串:
1
2
3
4
5
6
7
8
9
10
11
12
13
const generateRandomString = (() => { const cache = {}; return () => { const randomString = (Math .random () / Date .now ()).toString (36 ).slice (-9 , -1 ); if (!cache[randomString] && /^[a-zA-Z]/ .test (randomString)) { cache[randomString] = 1 ; return randomString; } else { return generateRandomString (); } }; })();
generateRandomString 采用闭包配合缓存的方式生成随机字符串,由于闭包的特性,生成的随机字符串在用于生成 prefix 时是完全不会重复的。
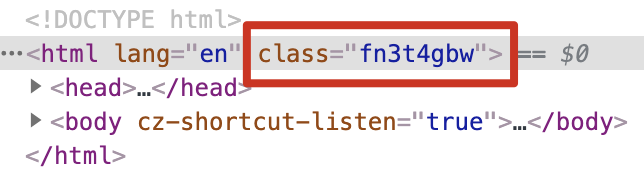
除此之外,在沙箱挂载时,需要给 html 标签设置类名,类名名称为 prefix 的值:
1 this .rootElement .classList = [...this .rootElement .classList , this .prefix ].join (' ' );
当沙箱被挂载时,可以看见如下效果:
1 this .rootElement .classList = Array .from (this .rootElement ).filter (item =>this .prefix ).join (' ' );
Faun 同时采用 以上三种方法以保证样式的隔离。
全局变量隔离 全局变量同样需要被隔离,以防不同子应用依赖了 window 上同一个键名的全局变量。对全局变量的隔离处理能力同样收敛于沙箱中:window 上所有变量,并保存至 props.windowSnapshot 中,除此之外,在 props.modifyPropsMap 中记录下 window 上的可写变量:
1
2
3
4
5
6
7
8
9
10
11
12
13
const takeWindowSnapshot = function (props ) { props.windowSnapshot = {}; traverseProps (window , prop => props.windowSnapshot [prop] = window [prop]; }); Object .keys (props.modifiedPropsMap ).forEach (prop => if (Object .getOwnPropertyDescriptor (window , prop).writable ) { window [prop] = props.modifiedPropsMap [prop]; } }); };
在沙箱被卸载时,遍历 window,并与 props.windowSnapshot 中同名属性对比,如果不相等,说明挂载完成后该属性已经发生改变,因此需要从 props.modifyPropsMap 中恢复这个变量:
1
2
3
4
5
6
7
8
9
10
11
this ._modifyPropsMap = {};traverseProps (window , prop => if ( window [prop] !== this .windowSnapshot [prop] && Object .getOwnPropertyDescriptor (window , prop).writable ) { this ._modifyPropsMap [prop] = window [prop]; window [prop] = this .windowSnapshot [prop]; } });
事件监听器隔离 采用重写 window.addEventListener 的方式监听事件监听器的修改:
1
2
3
4
5
6
7
8
9
10
11
12
13
14
15
16
17
18
19
20
21
22
23
24
25
26
27
28
29
30
31
32
33
34
35
36
37
38
39
import { noop } from '../utils/lodash' ;const originalAddEventListener = window .addEventListener ;const originalRemoveEventListener = window .removeEventListener ;export default function rewriteEventListener ( const listenerMap = new Map (); window .addEventListener = (type, listener, options ) => { const listeners = listenerMap.get (type) || []; listenerMap.set (type, [...listeners, listener]); return originalAddEventListener.call (window , type, listener, options); }; window .removeEventListener = (type, listener, options ) => { const storedTypeListeners = listenerMap.get (type); if (storedTypeListeners && storedTypeListeners.length && storedTypeListeners.indexOf (listener) !== -1 ) { storedTypeListeners.splice (storedTypeListeners.indexOf (listener), 1 ); } return originalRemoveEventListener.call (window , type, listener, options); }; return function free ( listenerMap.forEach ((listeners, type ) => [...listeners].forEach (listener =>window .removeEventListener (type, listener)), ); window .addEventListener = originalAddEventListener; window .removeEventListener = originalRemoveEventListener; return noop; }; }
publicPath 处理函数在常见的前端打包工具中,通常会提供类似于构建产物前缀的选项,例如 Webpack 中的 publicPath 。很多应用都不会将 URL 的主机名、端口、协议等写入该选项,因为写入相对的路径会更有利于域名或其他 URL 相关的更换或迁移。/path/to/0.chunk.js,此时在主应用中加载这个 URL 的资源必然会导致错误的发生。assetURLMapper (用法在前文中提到)。appendChild 、insertBefore 、append 和 prepend 四种方法以监听并拦截 Chunked 资源的插入,并调用 assetURLMapper 修改它们的 URL:
1 2 3 4 5 6 7 8 9 10 11 12 13 14 15 16 17 18 19 20 21 22 23 24 25 26 27 28 29 30 31 32 33 34 35 36 37 38 39 40 41 42 43 44 45 46 47 48 49 50 51 52 53 54 55 56 57 58 59 60 61 62 63 64 65 66 67 68 69 70 71 72 73 74 75 76 77 78 79 80 81 82 83 84 85 86 87 88 89 90 91 92 93 94 95 96 97 98 99 100 101 function getNodeName (node ) { return node.nodeName && node.nodeName .toLowerCase () || '' ; } function getResultElement (element, processor ) { const nodeName = getNodeName (element); if (/^script$|^link$/ .test (nodeName)) { const result = processor && typeof processor === 'function' && processor (element); if (result) { return result; } return element; } return element; } function mapHTMLCollection (collection, processor ) { const args = Array .from (collection); const results = args.map (arg => if (arg instanceof Element ) { return getResultElement (arg, processor); } return arg; }); return results; } export default function ( const appendChild = Element .prototype appendChild ; const insertBefore = Element .prototype insertBefore ; const append = Element .prototype append ; const prepend = Element .prototype prepend ; function overwriteAppendChild (callback ) { Element .prototype appendChild = function (element ) { return appendChild.call (this , getResultElement (element, callback)); }; } function overwriteInsertBefore (callback ) { Element .prototype insertBefore = function (newChild, refChild ) { return insertBefore.call (this , getResultElement (newChild, callback), refChild); }; } function overwriteAppend (callback ) { if (!append) { return ; } Element .prototype append = function ( const results = mapHTMLCollection (arguments , callback); return append.call (this , ...results); }; } function overwritePrepend (callback ) { if (!prepend) { return ; } Element .prototype prepend = function ( const results = mapHTMLCollection (arguments , callback); return prepend.call (this , ...results); }; } return { intercept (callback ) { overwriteAppendChild (callback); overwriteInsertBefore (callback); overwriteAppend (callback); overwritePrepend (callback); }, stop ( Element .prototype appendChild = appendChild; Element .prototype insertBefore = insertBefore; Element .prototype append = append; Element .prototype prepend = prepend; }, }; }
通过快照封装隔离逻辑 Faun Sandbox 实现了快照技术用于记录 DOM 和 window 对象上的变化。takeDOMSnapshot 和 restoreDOMSnapshot 实现,而对于 window 的变更,则通过 takeWindowSnapshot 和 restoreWindowSnapshot 实现。
Sandbox.protototype.takeDOMSnapshot1 2 3 4 5 6 7 8 9 10 11 12 13 14 15 16 17 18 19 20 21 22 23 24 25 26 27 28 29 30 31 32 33 34 35 const takeDOMSnapshot = function (props ) { const _this = this ; props.childNodeOperator .intercept (function (element ) { const nodeName = element.nodeName && element.nodeName .toLowerCase () || '' ; switch (nodeName) { case 'script' : { const src = element.getAttribute ('src' ); if (src) { element.setAttribute ('src' , _this.assetURLMapper (src)); } break ; } case 'link' : { const href = element.getAttribute ('href' ); const rel = element.getAttribute ('rel' ); if (href && rel === 'stylesheet' ) { element.setAttribute ('href' , _this.assetURLMapper (href)); } break ; } default : break ; } return element; }); props.observer && props.observer .observe (document .documentElement , { attributes : true , childList : true , subtree : true , }); };
Sandbox 通过 MutationObserver 监听 DOM 的变化,并记录在 props.domSnapshot 中。script 和 link 的资源 URL 的处理逻辑。
Sandbox.prototype.restoreDOMSnapshot在沙箱卸载时,该方法被调用,用于恢复原生 DOM 子元素操作以及其他清场工作:
1 2 3 4 5 6 const restoreDOMSnapshot = function (props ) { props.domSnapshot .forEach (node =>remove ()); props.styleElements .forEach (element =>remove ()); props.observer && props.observer .disconnect && props.observer .disconnect (); props.childNodeOperator .stop (); };
Sandbox.prototype.takeWindowSnapshot请见全局变量隔离 一节。
Sandbox.prototype.restoreWindowSnapshot在沙箱卸载时,该方法被调用,用于恢复挂载前 window 对象的可写属性:
1 2 3 4 5 6 7 8 9 10 11 12 13 const restoreWindowSnapshot = function (props ) { props.modifiedPropsMap = {}; traverseProps (window , prop => if ( window [prop] !== props.windowSnapshot [prop] && Object .getOwnPropertyDescriptor (window , prop).writable ) { props.modifiedPropsMap [prop] = window [prop]; window [prop] = props.windowSnapshot [prop]; } }); };
沙箱的挂载与卸载 在 Sandbox 中通过 mount 和 unmount 实现挂载与卸载。
Sandbox.prototype.mount沙箱被挂载时,调用该方法,并开始控制快照的拍摄:
1 2 3 4 5 6 7 8 9 10 11 12 13 14 15 16 17 18 19 20 21 22 23 24 25 26 27 28 29 30 31 const mount = function (props ) { this .takeDOMSnapshot (); props.disableRewriteEventListeners = overwriteEventListeners (); const checkExistElement = document .getElementById (this .mountPointID ); if (checkExistElement) { checkExistElement.remove (); } document .body .appendChild (Array .prototype slice .call ([props.mountPointElement ])[0 ]); const prefixElement = this .prefixElementSelector () || props.defaultPrefixElement ; if (prefixElement && prefixElement instanceof Node && this .useCSSPrefix ) { prefixElement.classList = [...prefixElement.classList , props.prefix ].join (' ' ); } if (props.styleElements && Array .isArray (props.styleElements )) { props.styleElements .forEach (element =>document .head .appendChild (element)); } !!props.windowSnapshot .length && this .restoreWindowSnapshot (); props.bundleExecutors && props.bundleExecutors .forEach (executor => if (isFunction (executor)) { executor.call (); } }); };
Sandbox.prototype.unmount在沙箱卸载时调用此方法,用于管理快照的恢复和清场:
1 2 3 4 5 6 7 8 9 10 11 12 13 14 15 16 const unmount = function (props ) { const currentMountPointElement = document .getElementById (this .mountPointID ); currentMountPointElement && currentMountPointElement.remove (); const prefixElement = this .prefixElementSelector () || props.defaultPrefixElement ; if (prefixElement && prefixElement instanceof Node && this .useCSSPrefix ) { prefixElement.classList = Array .from (prefixElement.classList ).filter (item =>prefix ).join (' ' ); } this .takeWindowSnapshot (); props.disableRewriteEventListeners && props.disableRewriteEventListeners (); this .restoreDOMSnapshot (); props.domSnapshot .splice (0 , props.domSnapshot .length ); };
通过路由变化控制沙箱挂载与卸载 Faun 实现了对路由的监听以及基于 Sandbox 快照的方式管理子应用的生命周期行为。Faun 完整的功能需要通过路由机制将路由变化与各个沙箱联系起来。
1 2 3 4 5 6 7 function Faun ( const props = { sandboxes : [new Sandbox ('@@default' )], } }
此外,一个名为 position 的指针用于表示目前的路由对应着栈中的哪一个 Sandbox:
1 2 3 4 5 6 7 function Faun ( const props = { position : 0 , } }
当路由回退或前进时, direction 指针通过 forward 和 backward 标明当前操作是前进还是回退:
1 2 3 4 5 6 7 function Faun ( const props = { direction : 'forward' , } }
对于如何判断当前操作是前进还是后退,History 并没有提供一个有效的 API,仅仅只是通过 POP 表示目前在进行历史回溯操作,因此,需要重写 History 中的一些 API 达到判断操作方向的目的:
1 2 3 4 5 6 7 8 9 10 11 12 13 14 15 16 17 18 19 20 21 22 23 24 25 26 27 28 29 30 31 32 33 34 35 36 37 38 39 40 41 42 43 44 45 46 47 48 49 50 51 52 53 54 55 56 57 58 59 60 let currentIndex = (history.state && history.state .index ) || 0 ;if (!history.state || !('index' in history.state )) { history.replaceState ( { index : currentIndex, state : history.state }, document .title , ); } const getState = Object .getOwnPropertyDescriptor (History .prototype 'state' ).get ;const { pushState, replaceState } = history;function onPopstate ( const state = getState.call (history); if (!state) { replaceState.call (history, { index : currentIndex + 1 }, document .title ); } const index = state ? state.index : currentIndex + 1 ; const direction = index > currentIndex ? 'forward' : 'back' ; window .dispatchEvent (new Event (direction)); currentIndex = index; } function modifyStateFunction (func, n ) { return (state, ...args ) => { func.call (history, { index : currentIndex + n, state }, ...args); currentIndex += n; }; } function modifyStateGetter (cls ) { const { get } = Object .getOwnPropertyDescriptor (cls.prototype 'state' ); Object .defineProperty (cls.prototype 'state' , { configurable : true , enumerable : true , get ( const _this = get.call (this ); return _this && _this.state || '' ; }, set : undefined , }); } modifyStateGetter (History );modifyStateGetter (PopStateEvent );history.pushState = modifyStateFunction (pushState, 1 ); history.replaceState = modifyStateFunction (replaceState, 0 ); window .addEventListener ('popstate' , onPopstate);
子应用生命周期 子应用的生命周期由主应用实现,目前的生命周期勾子有 6 个: loading、 loaded、 mounted、 beforeUnmount、 unmounted。生命周期的定义如下:
1 2 3 4 5 6 7 8 9 10 11 12 13 14 15 16 17 18 19 20 21 22 23 24 export default function ( const _HOOKS = ['loading' , 'loaded' , 'mounted' , 'beforeUnmount' , 'unmounted' ]; const hooks = {}; return new Proxy (hooks, { set : function (target, property, value, receiver ) { if (_HOOKS.indexOf (property) === -1 ) { throw new ReferenceError (`[Faun] Hook with name \`${property} \` is not allowed` ); } if (!isFunction (value)) { throw new TypeError ('[Faun] A hook should be a function' ); } Reflect .set (target, property, value); return true ; }, }); };
由于将生命周期函数设置到一个 Faun 并不理解的勾子上(例如勾子名称不是约定的 6 个之一)是不被允许的,因此需要将 hooks 对象包装在 Proxy 中,并实现一个白名单数组 _HOOKS 用于过滤非法的生命周期勾子注入。hooks 位于 Faun.prototype 上,需要在实例化 Faun 后设置 hooks:
1 2 3 4 5 6 7 8 9 10 11 12 13 14 15 16 17 18 19 20 21 22 23 24 25 26 27 28 29 30 31 32 const app = new Faun ();app.hooks .loading = function (pathname ) { console .log ('loading' , this ); console .log ('pathname: ' , pathname); }; app.hooks .loaded = function (pathname, sandbox ) { console .log ('loaded' , this ); console .log ('pathname: ' , pathname); console .log ('sandbox: ' , sandbox); }; app.hooks .mounted = function (pathname, sandbox ) { console .log ('mounted' , this ); console .log ('pathname: ' , pathname); console .log ('sandbox: ' , sandbox); }; app.hooks .beforeUnmount = function (prev, next ) { console .log ('beforeUnmount' , this ); console .log ('prev: ' , prev); console .log ('next: ' , next); return true ; }; app.hooks .unmounted = function (prev, next, sandbox ) { console .log ('unmounted' , this ); console .log ('prev: ' , prev); console .log ('next: ' , next); console .log ('sandbox: ' , sandbox); };
全局依赖 提供 setGlobalDependence 将全局的依赖设置在 window 上,子应用可以通过设置 external 的方式减少打包的体积,并在挂载到主应用时访问被排除在外的全局依赖。
1 2 3 4 5 6 7 8 9 10 11 12 const deps = [];this .addGlobalDependence = function (name, dep ) { if (name && dep) { deps.push ({ name, dep }); } };
在 Faun 实例启动时,将依赖注入到 window 中:
1 2 3 if (Array .isArray (deps) && deps.length ) { initGlobalDependencies (deps); }
其中, initGlobalDependencies 方法的实现如下:
1 2 3 4 5 6 7 8 9 10 11 12 13 14 15 16 17 18 19 20 21 22 23 24 export const initGlobalDependencies = function (deps ) { if (!Array .isArray ) { throw new TypeError ('[Faun] Param `deps` should be an array' ); } const globalDeps = deps.reduce ((current, next ) => { const { name, dep } = next; if (!name || !dep || typeof name !== 'string' ) { throw new TypeError ('[Faun] Params is in a wrong type' ); } if (window [name]) { throw new ReferenceError (`[Faun] Dependence \`${name} \` already exist on \`window\`` ); } current[name] = dep; return current; }, {}); Object .assign (window , globalDeps); return globalDeps; };
应用间通信和数据共享机制 应用间通信和数据共享机制依靠全局对象 window 上的某个命名空间,确保主子应用都能访问,并在此基础上提供相应的方法和事件处理器。其中,应用间通信机制采用发布订阅模式实现。
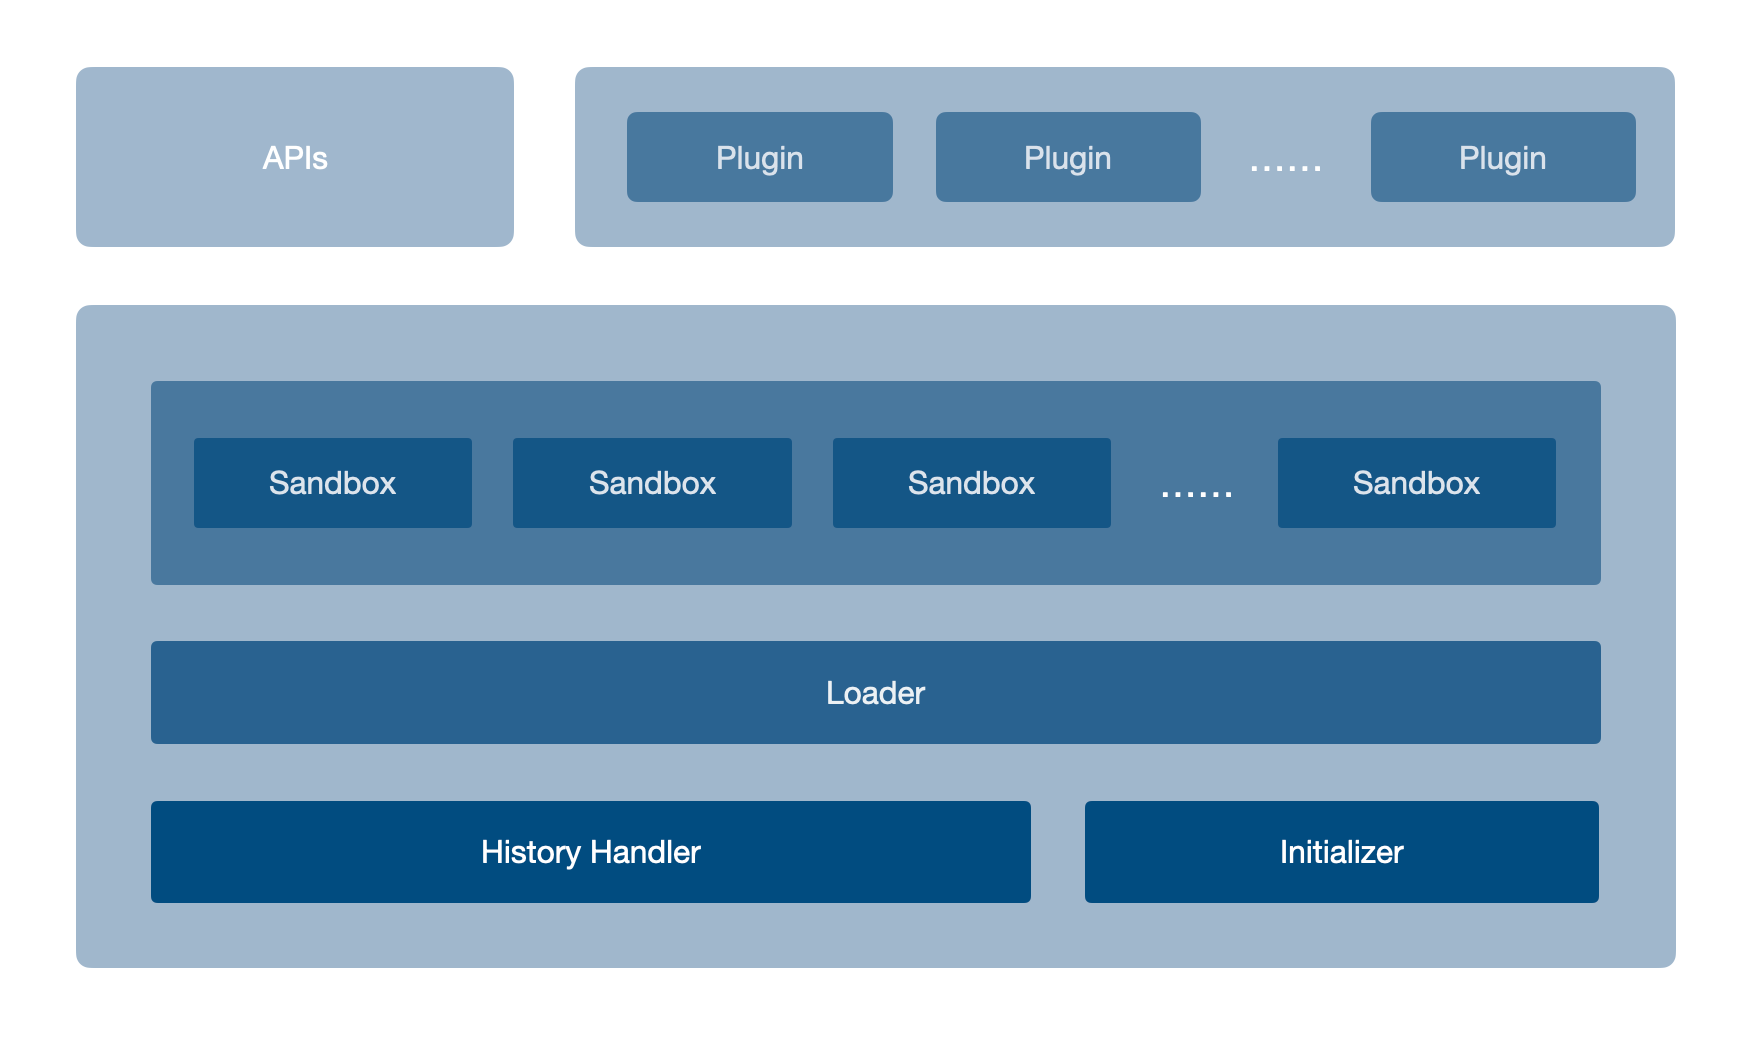
总结 对以上技术实现的合理组合和设计,最终可以形成完成度较高的最基础的微前端方案 Faun。Faun 融合了 SingleSPA、Qiankun、Icestark 等流行微前端方案的优势,又与这些方案有一些设计上的差异。Faun 在使用体验上比较接近 Icestark,在血缘上类似于 Qiankun 和 SingleSPA。
相关链接
项目 GitHub 地址:https://github.com/lenconda/faun.git https://www.npmjs.com/package/faun https://faun.lenconda.top
参考资料